1.8 Resize
Home and Learn - Free Excel VBA Course
8.1 Open a Text File in Excel VBA
Being able to open a text or a csv file with Excel VBA is a useful programming skill to add to your repertoire. In this section, you'll learn how to do just that.
A CSV file (Comma Separated Value) is one where the items on each line are separated by commas, and the line itself ends in a carriage return (pressing the Enter key on your keyboard). They look like this:

If your file has comma separated values, you can save it with the ending in .csv or .txt. Files ending in csv are, however, a common format, and we'll stick with those types of files.
If a file has each item on a line separated with the Tab character then it is said to be a TXT file. They look like this:

You can, of course, open a text file straight from Excel. Just use the Data > Get External Data from Text options on the Excel Ribbon. This would then bring up the Text Import Wizard. However, as a VBA programmer, it's nice to know how to do it yourself. Plus, you can do things by manipulating the text file yourself that you can't do with the Wizard. What we're going to do is to open up the above CSV file and place the ISBN in the A column, rather than in the last column as we have it at the moment.
To follow along with this lesson, you can download the file by clicking the link below. Right-click the link and save it to your computer. Remember the location where you save this file to.
Authors CSV File (Right-click to save)
In Excel, create a new blank workbook. Click the A column and format it as Text. This is because our ISBN is in the number format in the text file. If you leave the A column on General then you'll get a strange number for the ISBN.
Now open up your VBA Editor to get at the coding window. Create a new Sub and call it OpenTextFile. As the first line of your code, add the following:
Dim FilePath As String
This just sets up a variable called FilePath.
We now need the location of our authors.csv file. We placed ours in the Documents folder (Windows 7). Because it's in the Documents folder, we can use the built-in Application.DefaultFilePath. The default file path is the Documents folder. We then only need to add on the file name, preceded by a backslash:
FilePath = Application.DefaultFilePath & "\authors.csv"
If you placed your file somewhere else, you can do something like this instead:
FilePath = "C:\Users\Owner\VBA\authors.csv"
This file path points to a folder called VBA that is in the Owner folder in C:\Users. But amend your own file path to point to where you saved your authors.csv file.
File Names, Modes, File Numbers
To open a file, you start with the word Open. You then specify a File Name, a Mode, and a File Number.
Open FileName For Mode As FileNumber
The Mode above should be replaced by one of the following:
Append - used for adding data to an already
existing file
Output - used to write to a file
Input - used to read a file
Binary - used to read or write data in byte format
Random - used to place characters in a buffer of a set size
The Modes that we're interested in are the Input and Output ones.
The FileNumber can be any number between 1 and 511. You precede the number with the # character. So if you're opening one file you'd have #1. If you open up a second, different file it would be #2, and so on.
So add this line to your code:
Open FilePath For Input As #1
The file we want to open is the one we stored in the variable called FilePath. You can also type the entire file path here, enclosed in double quotes:
Open "C:\Users\Owner\VBA\authors.csv" For Input As #1
We want to read this file only, so we have For Input. This is the first file we're going to open, so it is #1 (file number 1).
The next line is to set a variable for row numbers. We'll use this for the ActiveCell on the spreadsheet:
row_number = 0
At the moment, we've only told VBA to open the file. We haven't actually done anything with it. The way you normally do something with a file is to loop round, grabbing each line as you go. We'll use a Do Until loop for this:
Do Until EOF(1)
Loop
Notice the strange end condition: EOF(1). The EOF means End Of File, while the 1 in round brackets is the file number you specified earlier.
Inside of the loop, we first have this somewhat complex line:
Line Input #1, LineFromFile
The first three items before the comma refer to a single line of input from your file number (#1). After the comma, you tell VBA where you want to place this line. This will be a variable. We've called ours LineFromFile. Every time round the loop, a new line will be grabbed from the text file and placed in this variable.
Parse the Line
Now that you have a line from your text file, you need to do something with it. However, the line will still have all the commas in it. So the first line for us will be this:
Christopher, Brookmyre, 9780349114903
You need to parse the lines from your text file in some way. A good way to parse a line is with the Split function you met earlier. By using Split, you can place each item from a line into an array:
LineItems = Split(LineFromFile, ",")
Between the round brackets of Split, we have the variable we want to split, which is LineFromFile. After a comma, we have the separator we want to look for. The separator is the comma, for us.
When Split has finished, we'll have an array called LineItems. Our text file always has three items per line (first name, last name, ISBN). So we know the array goes from 0 to 2 positions. We can now go ahead and place each item into a cell on the spreadsheet:
ActiveCell.Offset(row_number, 0).Value = LineItems(2)
ActiveCell.Offset(row_number, 1).Value = LineItems(1)
ActiveCell.Offset(row_number, 2).Value = LineItems(0)
Between the round brackets of Offset we have the row number and the column number. We're using the variable called row_number for the rows. We set this to 0 earlier. (We'll increment this variable shortly). The columns are always offset at 0, 1 and 2. A value of 0, remember, keeps you in the same column. A value of 1 moves you 1 column over, and a value of 2 moves you 2 columns over from the ActiveCell.
To the right of the equal sign, we have our LineItems array. Because we want the ISBN in the A column, we've used LineItems(2) as the first value after the equal sign. We next have LineItems(1), which will get us the last name in the B column. Finally, we have LineItems(0), which will get us the first name in the C column.
The final thing to do inside of the loop is to increment the row_number variable, otherwise we'll be stuck on the first row of the spreadsheet.
row_number = row_number + 1
When you open a file, you should close it somewhere in your code. This is fairly straightforward:
Close #1
You type the word Close and then, after a space, the file number you're trying to close.
But the whole of your code should look like this:

Test it out. Make sure any cell in the A column is the Active cell on your spreadsheet (the A column is the one your formatted to Text). Go back to your code. Click anywhere inside of your sub and press F5 to run it. Go back to your spreadsheet and you should find that the data from the text file has been imported:
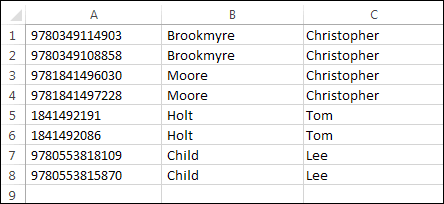
And there we go! We've opened up a CSV file, reordered the columns and placed the information into cells on a spreadsheet. We'll now look at writing to a text file.
Next Lesson: 8.2 Write to File >