1.8 Resize
Home and Learn - Free Excel VBA Course
9.5 Add a New Excel Tab, Part Two
In the previous lesson, you saw how to add an item to an existing tab in Excel. In this lesson, you'll learn how to add an entirely new tab to the Ribbon bar. (This lesson is for those who have Excel 2010 or greater. Excel 2007 doesn't let you customize the ribbon.)
Return to Excel and click the File menu at the top. From the File menu, click on Options. You'll then see the options dialogue box appear. From the list on the left, click on Customize Ribbon.
To add a new tab to the Excel ribbon, click the New Tab button at the bottom of the Customize the ribbon listbox. The new tab appears after the item you selected in the listbox. In the image below, we have selected the View tab. When the New Tab button is clicked this new tab is placed after the View tab:

We now have two items: New Tab (Custom) and New Group (Custom). You can rename these. Click on New Tab (Custom) to select it. Then click the Rename button. A small dialogue box appears:

Type a new name for your tab. We've called ours My Macros.
Now select the default group name New Group. Click the Rename button again and type a new name for the group (you don't need to select an icon):

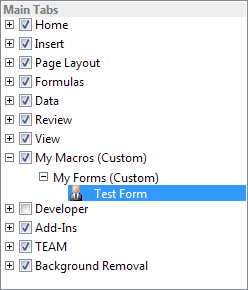
Click OK to see the newly renamed tab and group:

If we wanted to, we could add more group names, here. Each group name would then be a separate panel on our new tab.
We don't have any items in our new group, at the moment. To add a new item, select a group name. From the listbox on the left, select the name of a Macro. Then click the Add button in the middle:

So we've added CallUserForm to the My Forms group.
You can rename items in your groups, and change their icons. Select CallUserForm under the My Forms group. Now click the Rename button again. From the dialogue box choose an icon and type a new name:

Click OK to see how it looks:

You can add as many items to a group as you want by repeating the steps above. Or create new groups on your new tab by clicking the New Group button.
Click OK on your Excel Options dialogue box and have a look at the Excel ribbon at the top. You should see your new tab:
![]()
Click on your tab to select it, and you'll see your new groups and any items you've added to the groups:

In the image above, our group name was My Forms. The item we added to this group was called Test Form. Both of these are on the My Macros ribbon.
Click your new Test Form to try it out. You should find that your User Form displays when you click the Test Form icon.
In the next section, you'll create a more sophisticated User Form when we design and code an Excel Picture Viewer.
Next Lesson: 10.1 Walkthrough One >