1.8 Resize
Home and Learn - Free Excel VBA Course
10.3 Option Buttons and Command Buttons
Ongoing tutorial - First part is here: Part One
To add the YES and NO option buttons, locate the Option Button control in the toolbox:

Draw two of them on the form. Set the following Properties for your two buttons:
OptionButton1
Caption: Yes
Height: 18
Width: 50
Left: 102
Top: 258
OptionButton2
Caption: No
Height: 18
Width: 50
Left: 162
Top: 258
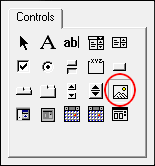
To add the picture box, locate the Image control in the toolbox:

Draw one on your form and set the following properties for it:
Height: 210
Width: 288
Left: 258
Top: 66
Adding Command buttons to a Form
Finally, we need to add the three command buttons. So draw three of them on the form. Set up the following properties for each button:
CommandButton1
Name: cmdLoad
Caption: Load Image Information
Height: 36
Width: 190
Left: 24
Top: 6
CommandButton2
Name: cmdBack
Caption: Previous Photo
Height: 30
Width: 114
Left: 258
Top: 312
CommandButton3
Name: cmdNext
Caption: Next Photo
Height: 30
Width: 108
Left: 438
Top: 312
And that's all the controls for View Photos page. In the next lesson, you'll design the Add New Photo tab of the form.
Next Lesson: 10.4 Add New Tab >